Pencil Drawing
Inspired by Cath Riley


Lino Printing
Inspired by Deborah Klein


The Process:
-
After collecting all your materials and equipment, you first get your paper printed image and begin to shade the back of it using the graphite stick/pencil. To ensure there is enough surface coverage (and there is enough graphite to leave a print for later), you want to shade at an angle while applying enough pressure to the paper.
-
Secondly, get your sheet of lino and place your image on it, graphite side down. Secure it using masking tape (do not use normal cello tape as it will tear the image). Then, using a biro pen (preferably a bright colour to see your markings) directly trace on your image. Make sure you draw on the printed parts, leaving the white areas out. This will take some time and patience as you want to get every detail as possible depending on how complex your image is.
-
Next, carefully lift your image off. You should see a graphite print of your image on the lino sheet – if it looks incomplete or anything of the sort, secure the image back down and trace using biro. Using a black permanent marker, sharpie, draw on the graphite printed image directly on the lino. Like the previous step, make sure you draw on the printed parts, leaving the lino areas out. By doing this step, it will ensure you have a clear enough image to work with when carving out the lino.
-
Now, this is where you start to carve out your image you want to print. Grab your etching tool and make sure the blade is the right thickness/shape to cut the lino. You only want to carve out the lino/ ‘negative’ areas avoiding the black marker lines. TIP: When carving your lino print always carve away from yourself in case you slip and get injured – this may happen, so have some plasters nearby! After this process, you should be left with a lino copy of the image.
-
Get the ink - in your colour of choice - and place a blob of it on the whiteboard. Then cover your roller with the ink by rolling the roller across the whiteboard so it can collect and get fuller coverage of the ink – when you start to hear a sizzling sound, lift the roller from the whiteboard and start rolling the ink onto the lino print. Make sure you roll the ink up and down multiple times to ensure there is enough ink coverage on the lino. P.S. Get some old newspaper and line your work top, before using the ink, so it stays clean.
-
After rolling, place your roller to the side and get your piece of paper (or any other ink safe material) you want to print your image on. Carefully lift and turn the lino around with the ink side facing down. TIP: Before directly printing, hover it over the piece of paper so you adjust the lino image to get a good angle and to ensure your image will look neat and tidy. Then place the print down and get a clean roller and roll-on top of the lino so the ink can print properly.
-
Finally, peel the lino off. Now you should be left with your print! Now let it dry and you’re done!


Etching
Inspired by Amy Ferguson - Print & Press

Oil Painting
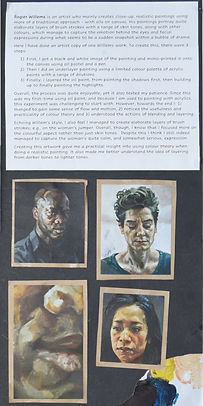
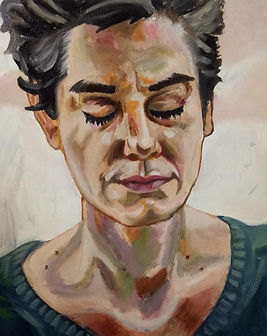
Inspired by Rogier Willems
My Swatches:


My Final Piece:

Coloured Pencil Study
Jose Vergara - Redosking

My outcome
For my personal response, I had decided to pursue the idea of time and nature surrounding humans and being part of them. In my final piece, I wanted to also delicately present the beauty of old age which reflects the passing of time in nature. Often, beauty is automatically associated with women, so, I decided to use an image of my grandad as the reference to challenge this social construct.
The media I used in this piece were:
- graphite pencil
- lino prints using Indian ink
- colour pencil
The artists I was inspired by:
- Cath Riley (structure and media)
- Deborah Klein (media)
- Jose Vergara - Redosking (media)
Areas of my outcome I am pleased with:
I am glad that I managed to capture a moment of joy and contentment in this classic expression of my grandad's. Using Riley's technique I was able to bring out his bold yet gentle gaze, and make hair, in this case a beard, a striking feature. I think I successfully conveyed the slightly wrinkled yet soft texture of his skin.

Anna Colette Hunt [Ceramics]
My Response
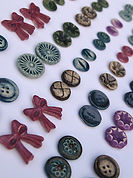
A key characteristic of Anne Collette Hunt’s work is uncovering and re-presenting objects of interest in history, both from the natural world and the world of manmade objects. In the Stirring Swarm, she presents beautiful, yet haunting hybrid bugs. These are exhibited behind glass cases, reflecting an earlier historical tradition of collecting natural specimens and curiosities. Similarly, in her other work, she has evoked her childhood memories and childhood curiosity in the form of ceramic jewellery representing her grandmother’s button collection in the form of stud earrings. The past is also embedded in her ceramic brooches, through details imprinted using salvaged historical printing blocks, which present designs of birds, plants, and objects. In both the Stirring Swarm and the Ceramic Jewellery collections, Hunt identifies past interests and skills that have become dormant, lost, forgotten, and hidden and reanimates them through her art.
In the Stirring Swarm, the arrangement of the exhibition itself is part of the artform as well as the individual pieces. By doing so she makes us revisit and reconsider an interest that was socially in vogue, also making us ponder on man’s detrimental power over the natural world by portraying the bugs as being pinned down and preserved, almost like jewellery, with gold details and glaze. In contrast, the button collection has arisen from her very personal memories of her grandmother as she reanimates them to give them a new aesthetic value. Interestingly, like the brooches, all three works take the form of collections rather than individual pieces. Through this, Hunt encourages us to think about the process of creative production as well as the end products themselves.


My Outcome:

Grayson Perry [Ceramics]
My Response
My Outcome Plan/Ideas:


My Outcome:
_edited.jpg)
_edited.jpg)

_JPG.jpg)
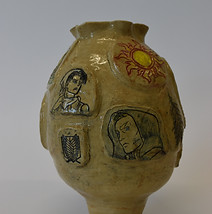
I used the coil method to create my desired pot shape.
I then created medullas of my planned drawings by carving into the clay using modeling tools, etching and sticking them onto the pot. I painted them and glazed the pot entirely, and was finally fired in the kiln.